T-shirt sewing workshop for beginners

This cute and comfortable set for sleeping: t-shirt and shorts were created by Anastasia Korfiati specially for the book “Homewear”. The loose-fitting T-shirt and elasticated shorts have a comfortable fit and are made from cotton jersey.
T-shirt sewing technology
The technology of sewing knitted T-shirts has certain features:
- The seams are sewn with a four-thread overlock.
- The sleeves are sewn into the open armhole, until the side seams are sewn.
- Attachments such as pockets, emblems, etc. are sewn on a sewing machine.
- Neck processing can be finished in various methods.
- Hems are processed in the following ways – finishing by overlock with a 3-thread or 4-thread flat seam or stitched with a double needle on a sewing machine.
- Decorate T-shirts with embroidery or appliqué.
T-shirt sewing workshop
Sew one shoulder seam with a four-thread overlock stitch.

Pic. 1. Sew one shoulder seam
Attach a special Jersey N 75 needle and a foot for knitwear to the sewing machine (if you do not have such a foot, you can use a standard foot by adjusting its pressure on the fabric). Overlock the top allowance of the pocket, fold and iron. Sew the top pocket seam on the sewing machine.

Pic. 2. Sew the top pocket seam on the sewing machine
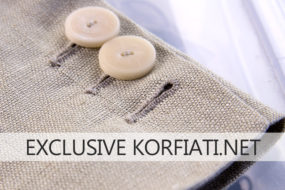
Important! The pocket is decorated with embroidery No. 9 “Seahorse” from the collection of exclusive drawings by Brother. See Brother Innov-is F480 sewing and embroidery machine review for more details.

Pic. 3. The pocket is decorated with embroidery No. 9 “Seahorse”
Fold the allowances on the other three sides of the pocket, put the pocket on the front of the T-shirt according to the markup, for better fixation, you can pin the pocket. Sew the pocket along the markings close to the edge.

Pic. 4. Sew the pocket
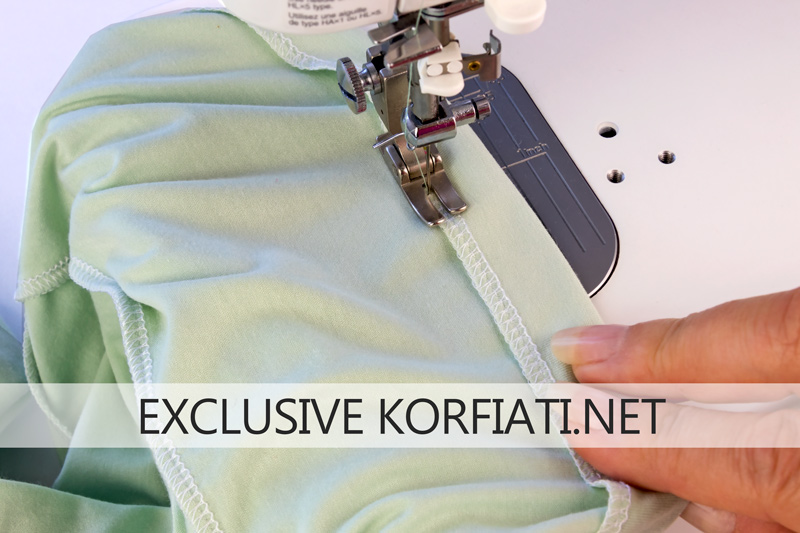
Fold the bias tape in half with the right side out and iron, slightly pulling. Sew the bias tape to the neckline with an overlock stitch, pulling it lightly as you sew.

Pic. 5. Sew the bias tape to the neckline
Bend the seam over the bias tape and iron. Sew the second shoulder seam and the bias tape in one stitch.

Pic. 6. Bend the seam over the bias tape and iron
Back neck finishing
The overlock seam along the neckline of the back on T-shirt is usually covered with bias tape. With this finishing the T-shirt looks much better and neater.
Cut out a 2 cm wide bias tape from the base material. Fold it in half and iron. Sew the bias tape with a straight stitch along the neckline of the back.

Pic. 7. Sew the bias tape with a straight stitch along the neckline of the back
The second seam is to the left of the first seam, as shown in fig. 9. At the beginning and end of the seam pull the tape to the right and start/end the seam.

Pic. 8. The second seam
Sew the tape along the second edge. At the beginning and at the end of the section, gently fold the tape as shown in fig. 9 and finish the seam, iron.

Pic. 9. Sew the tape along the second edge
Fold the front along the center line and re-stitch the tape at a 45° angle.

Pic. 10. Re-stitch the tape at a 45° angle
Stitch the neckline of the T-shirt.

Pic. 11. Stitch the neckline
Sew the sleeves into the open armholes.

Pic. 12. Sew the sleeves
Hems are the topstitch with a sewing machine.

Pic. 13. Hems are the topstitch with a sewing machine
Hems are the topstitch with a sewing machine.
Pic. 14. Hems are the topstitch with a sewing machine
T-shirt is the best!

Pic. 15. T-shirt is the best
You might be interested in:
- Women’s Measurements Charts
- Basic straight skirt
- Ease allowance of garments
- Longsleeve – simple sewing pattern


Я не понимаю
Hello. You can use the Russian-language website https://korfiati.ru/
super :))