Women’s Bomber Jacket PDF Pattern Sizes 36-44: Free Download!
Have you ever wondered what makes modern clothing striking and attractive? Many would say: precise fit, unusual cut, or a bold designer idea. While these elements can contribute to the success of a garment or collection, true masterpieces often arise from the intersection of simplicity and luxury – combining simple forms with exquisite fabrics yields stunning results!
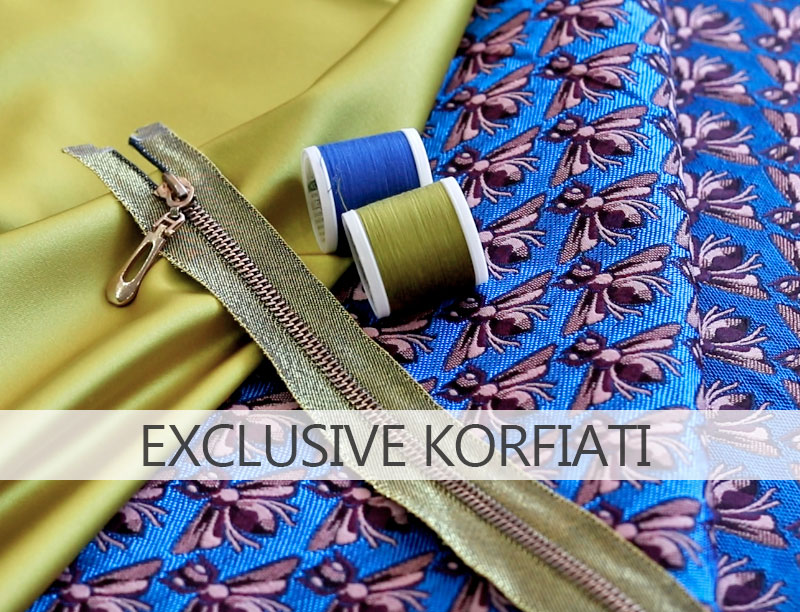
Inspired by high-end fashion, we’ve created a pattern for a gorgeous women’s bomber jacket with a zipper closure. To highlight the fabric’s sophistication, we chose a zipper with metallic teeth and slider.
Fig. 1. Fabric, liling, zipper and threads for bomber jacket
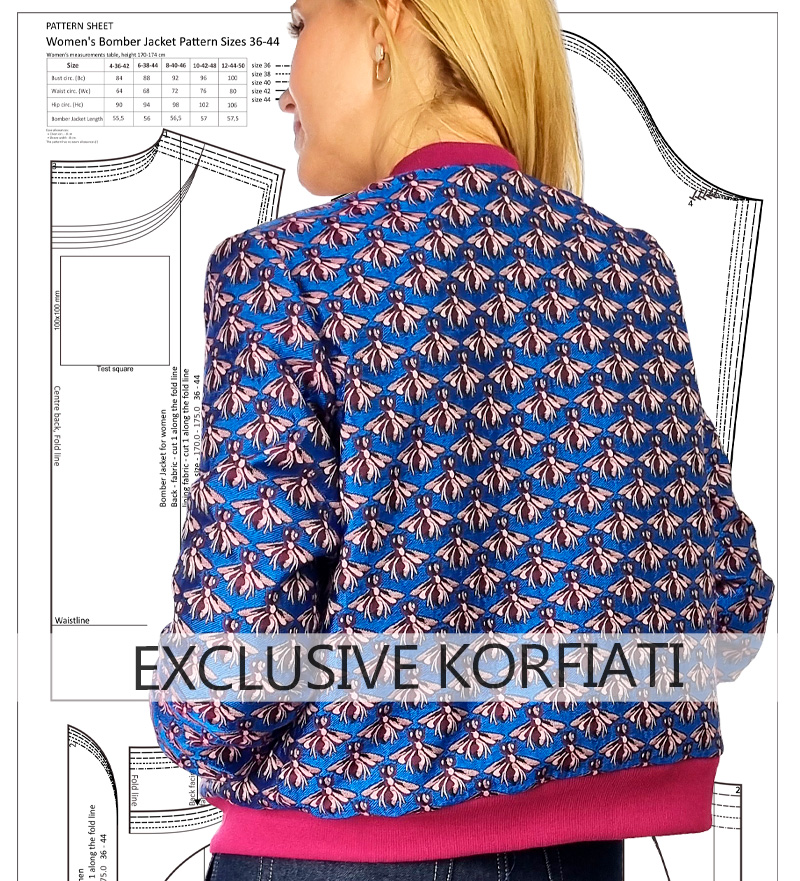
The cuffs and collar are made from ribbing that perfectly complements the main fabric’s color scheme.
Fig. 2. Bomber jacket – back
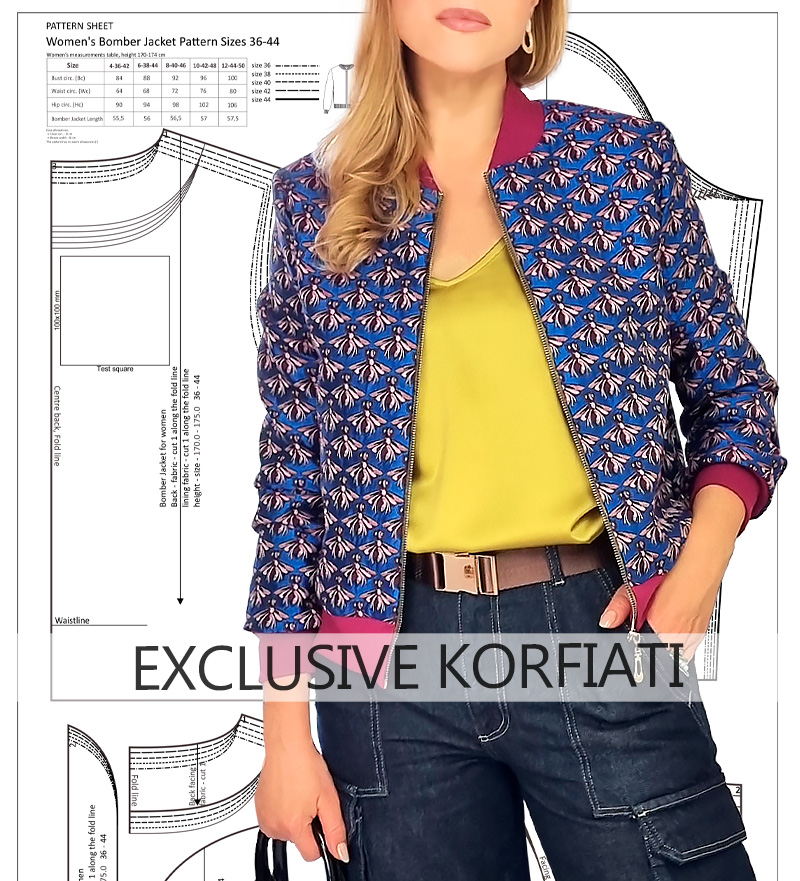
Super tip! This jacquard bomber jacket fits seamlessly into any style – from sporty to romantic. Pair it with wide cargo pants, dresses, or voluminous tulle skirts – it will look vibrant and eye-catching in any outfit. Just remember: for best results, keep the rest of your ensemble in solid colors.
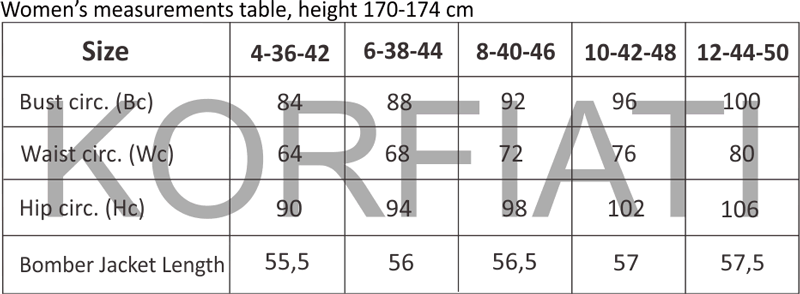
Women’s bomber jacket pattern is available in 5 standard sizes, ranging: EU 36-44 (US 4 -12). The design includes approximately 3,15 inches (8 cm) of ease allowance at the bust for a comfortable fit, and the same allowance amount of ease is added to the sleeve width. The length of the jacket varies slightly depending on the size 55,5 cm – 57,5 cm (back centre).
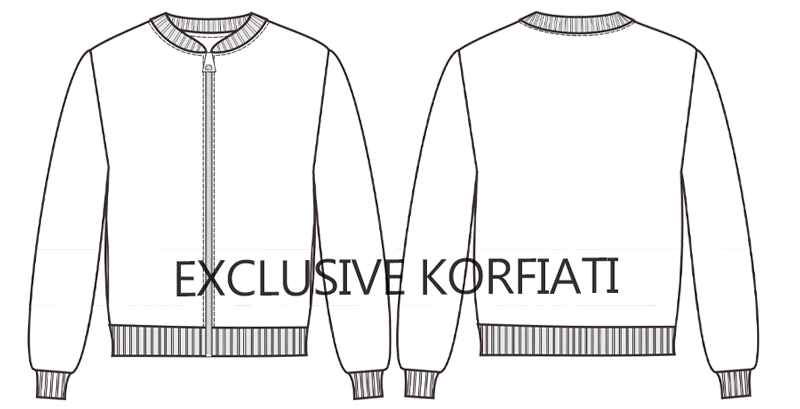
For a visual reference, please refer to Fig. 3, which shows front and back sketches of the bomber jacket.
Fig. 3. Front and back sketches of the bomber jacket
The pattern is available in two formats: a full-size version and a version for printing on standard A4 (8.27″ x 11.69″) sheets. If you’re using the A4 format, you’ll need to piece the printed sheets togethe. Each sheet features a grid system to make alignment easy – simply use a glue stick and scissors to piece them together. For a detailed guide on this process, please refer to our tutorial: “How to piece and check PDF Pattern”
Fig. 4. Table of basic women’s measurements
Important! This pattern does not include seam allowances. You’ll need to add these when cutting your fabric.
Click on the icon below to download the PDF Pattern:
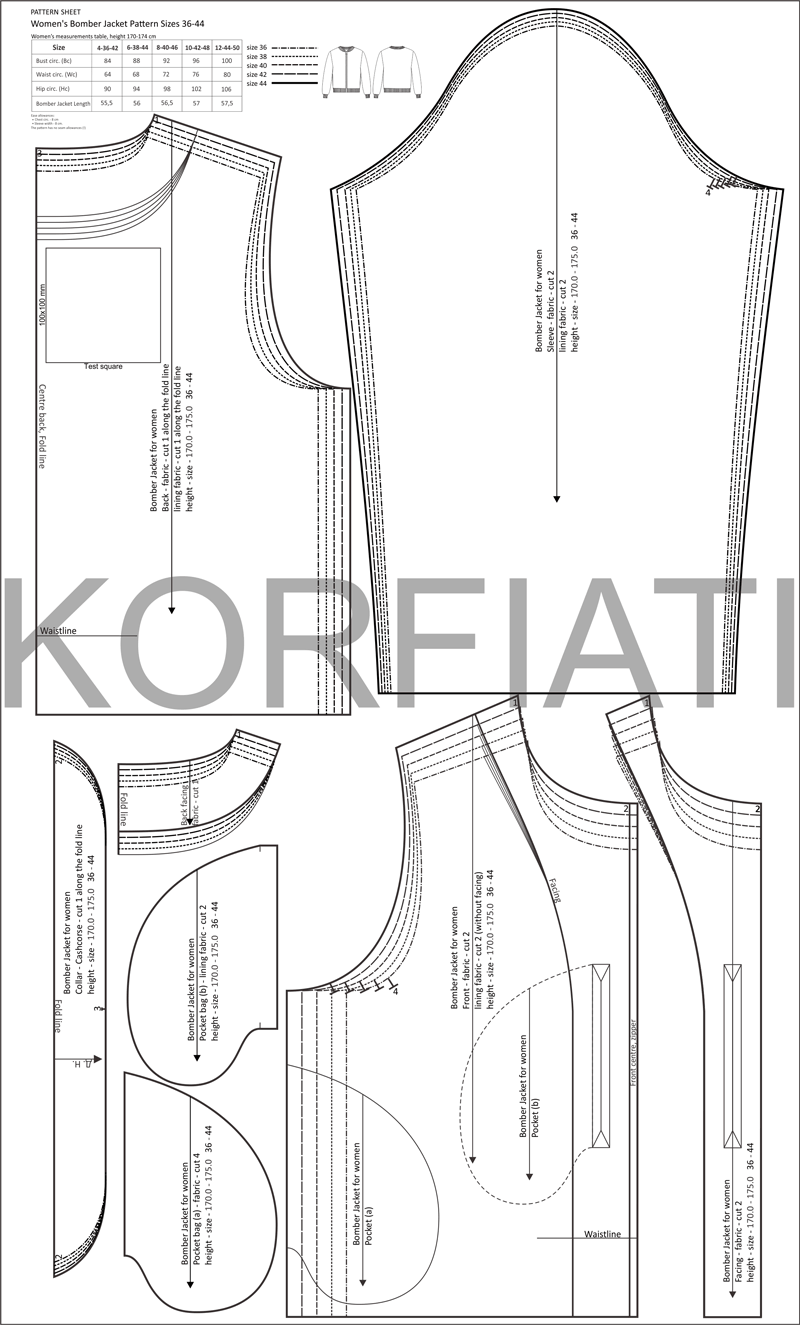
The pattern sheet layout is shown in Fig. 5. To ensure printing correctly, pdf-version includes a test square measuring 100 x 100 mm (approximately 4″ x 4″). Why is this necessary? Sometimes, printer settings can cause the image to compress. To prevent this, make sure your printer settings are set to “Actual Size” or “100% Scale.” It’s crucial to measure the test square after printing and double-check the assembled pattern to avoid any errors.
Fig. 5. Pattern sheet for Women’s Bomber Jacket Pattern, Sizes EU 36-44 (US 4-12)
Cut out the paper pattern pieces for your chosen size along the outlines.
Use masking tape to assemble the pieces along the seam lines.
Carefully try on this paper mock-up.
This process will give you a good idea of the garment’s structure. If you notice any obvious issues with volume or length, you can make adjustments to the pattern accordingly. Remember, this “tissue fitting” technique is a valuable step in achieving a well-fitted garment. It allows you to make preliminary adjustments before cutting into your fabric, potentially saving time and materials in the long run.
How to Cut and Sew a Women’s Bomber Jacket
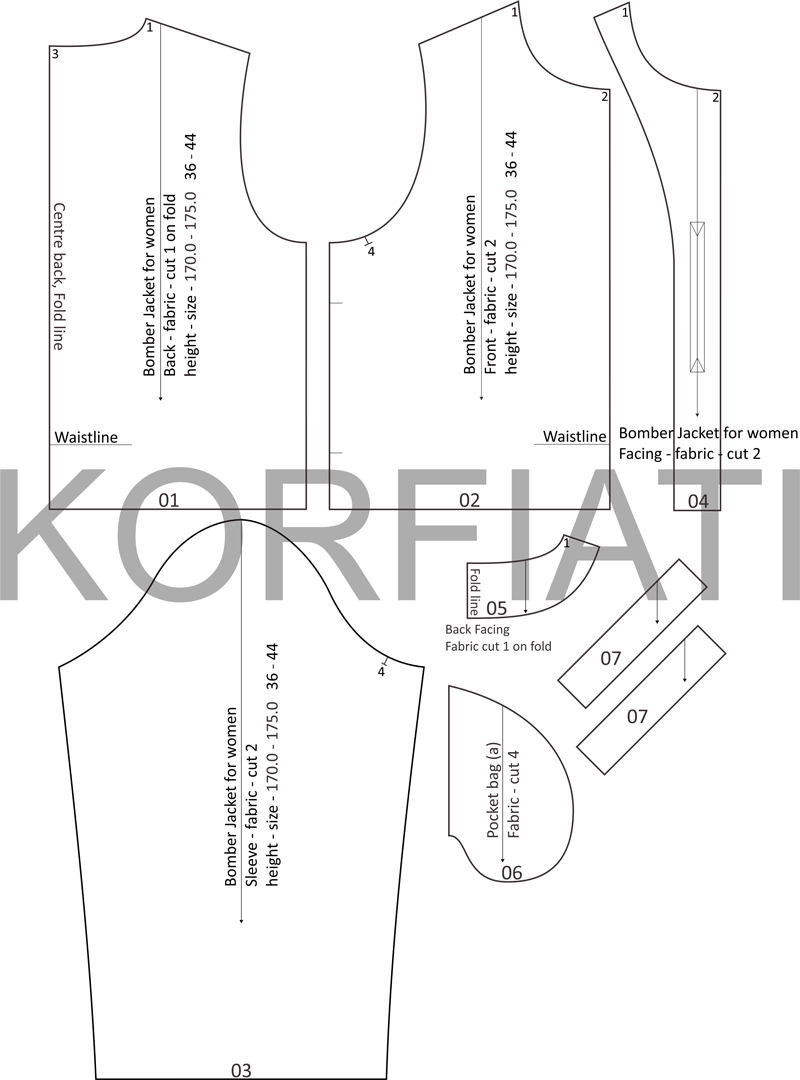
Download and print the pattern, assemble the sheets, select your size, and cut out the pattern pieces along the outlines. The main fabric cutting layout is shown in Fig. 6.
Fig. 6. Cutting fabric for a women’s bomber jacket
The cutting layouts for the ribbing and lining fabrics are shown in Fig. 7 and 8 respectively.
Straight stitch Sewing Machine – for sewing side seams, shoulder seams, and sleeve seams in both main and lining fabrics, as well as for constructing pockets.
Overlock Sewing Machine – for attaching sleeve cuffs and bottom band, and for inserting the collar into the neckline.
Main fabric cutting instructions (Fig. 4):
01 Back – 1 piece on fold
02 Front – 2 pieces
03 Sleeve – 2 pieces
04 Front facing – 2 pieces
05 Back neck facing – 1 piece on fold
06 Pocket bag 1 (side pocket) – 4 pieces
07 Inner pocket facing – 2 rectangles approximately 7.5″ (19 cm) long and 1.2″ (3 cm) wide each
Cut all pieces with 5/8″ (1.5 cm) seam allowances. During construction, trim seam allowances along sleeve hems, jacket hem, and neckline to 1/4″ (0.7 cm).
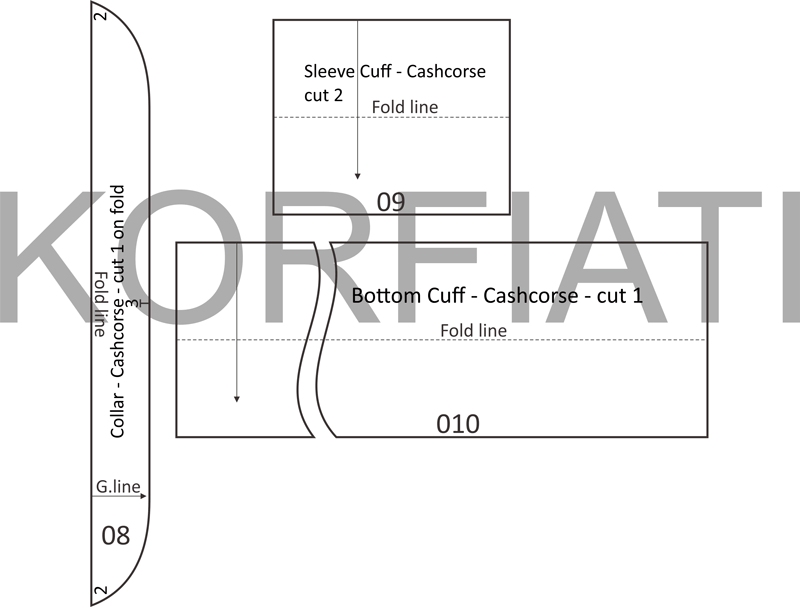
Ribbing fabric cutting instructions (Fig. 5):
08 Collar – 1 piece on fold
09 Sleeve cuff – 2 rectangles 5.5″ (14 cm) wide (2.75″ or 7 cm when folded) and 6.5″ – 6.7″ – 6.9″ – 7.1″ – 7.3″ (16.5 – 17.0 – 17.5 – 18.0 – 18.5 cm) long
010 Bottom band – 1 rectangle 5.5″ (14 cm) wide (2.75″ or 7 cm when folded) and approximately 35.4″ – 37″ – 38.6″ – 40.2″ – 41.7″ (90 – 94 – 98 – 102 – 106 cm) long
Cut all pieces with 1/4″ (0.7 cm) seam allowances.
Fig. 5. Cutting layout for collar and cuffs from cashcorse regular
Lining fabric cutting instructions (Fig. 6):
011 Back – 1 piece on fold (cut to exclude the back neck facing)
012 Front – 2 pieces (cut to exclude the front facings)
013 Sleeve – 2 pieces
014 Pocket bag 2 (inner pocket) – 2 pieces.
Cut all pieces with 5/8″ (1.5 cm) seam allowances. Cut the back piece with an additional 3/4″ (2 cm) pleat for ease allowance.
Fig. 5. Lining cutting layout for the women’s bomber jacket
Create a double-welt zippered pocket on the left front facing. After constructing the welt opening, first attach the zipper under the welts, then sew the pocket bags.
Construct the side seam pockets and sew the side seams.
Sew the shoulder seams and sleeve seams.
Using a four-thread overlock stitch, attach the ribbed cuffs to the sleeve hems and the bottom band (single layer) to the lower edge of the jacket.
Insert the separating zipper at the center front. First, stitch the zipper to half the width of the single-layer bottom band. Then wrap the remaining half of the band around the zipper and stitch up to the seam allowance (leave the long edge of the band’s seam allowance unstitched). When zipped, the exposed zipper teeth and tape should measure about 3/8″ (1 cm) wide.
Fold the ribbed collar in half with right sides out and steam-press to create a rounded shape. Insert the collar into the neckline using a four-thread overlock stitch.
Set in the sleeves, slightly easing the sleeve caps.
Assemble the lining. Stitch the back pleat 3/4″ (2 cm) from the top and bottom and press. Sew the front facings and back neck facing (cut from the main fabric) at the shoulder seams and attach to the lining.
Attach the lining to the neckline. For the bottom band: first, sew the lining to the single-layer bottom band (on short sections near the zipper), then break the stitching and attach the lining to both layers of the band. Sew a straight stitch exactly along the first overlock seam, stretching the band as you sew. Hand-stitch both layers of the band together on the short sections near the zipper.
Turn the lining right side out and insert the lining sleeves into the main garment sleeves. Fold under the hem allowances of the lining sleeves and hand-stitch to the cuffs, stretching the cuffs as you sew.
Fold under the seam allowances on the front facings along the zipper and baste to the zipper tape. Topstitch along the zipper 3/16″ (0.5 cm) from the edge, simultaneously attaching the facings, then continue stitching around the neckline without breaking the line of stitching.
Fig. 6. The bottom cuff from the lining side of the bomber jacket
You can find even more full-size, downloadable patterns on the Anastasia Korfiati Sewing School website in the ‘PDF Sewing Patterns’ category. Our collection is constantly expanding, and to ensure you don’t miss out on any important and useful content, subscribe to our free lessons and join us in sewing fashionable garments!






No Comments