Longsleeve – simple sewing pattern

The Longsleeve pattern is the basic pattern for stretch jersey models. Use a basic Longsleeve pattern for sewing turtlenecks, T-shirts, tops. You can change the neckline and sleeve length according to your own designs.
Measurements, required for a Longsleeve pattern
How to take measurements – free tutorial
All measurements are listed in centimeters. If you work with an inch ruler, use the centimeters to inches conversion table Measurements conversion
- Bust circumference – 92 cm (46 size)
- Back waist length – 42.5 cm
- Armhole depth – 20 cm (this value can also be calculated using the formula: Armhole depth = 1 / 10*Bust circ. + 10.5 cm)
- Shoulder length – 12 cm
- Neck circumference – 37 cm
- Sleeve length – 61 cm
- Bicep circ. – 29 cm
- Wrist circ. – 15,5 cm
- Longsleeve length – 64 cm
How to draft the Basic Longsleeve pattern
Prepare the sheet of paper, using the measurement that correspond to Half Bust circ. Start on the left side of the sheet.
Back/Front Longsleeve pattern
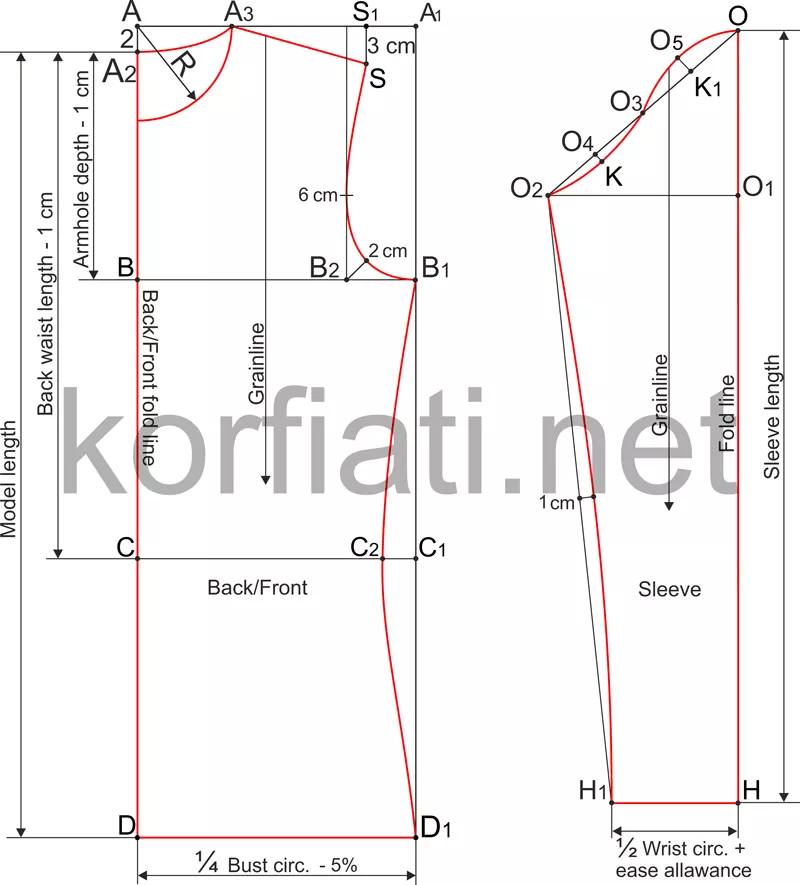
АD = А1D1 = 64 cm (Longsleeve length measurement (taking from the seventh cervical vertebra to the desired length)) .
АА1 = DD1 = ¼ Bust circumference minus 5% (not a fixed value and can be increased or decreased depending of the jersey quality).

Fig. 1. Longsleeve pattern
Neckline. AA2 = 2 cm. From point A draw a curve by radius R = 1/6 Neck circumference + 1.5 cm (for all sizes) = 37/6 + 1.5 ≈ 7.5 cm (Front neckline). Draw Back neckline curve, join point A2 to point A3.
Armhole line. A2B = 19 cm (The Armhole depth measure minus 1 cm).
AB = A1B1. Draw a horizontal line, join point B to point B1.
Waistline. A2C= 41.5 cm (Back waist length measure minus 1 cm). Draw a horizontal line CC1.
Armhole width. B1B2 = ½ (0.33 * Bicep circ. + 0.5 cm) = ½ (0.33 * 29 + 0.5) ≈ 5 cm. From point B2 draw up perpendicular to AA1.
Back / Front shoulder. From point A3 draw a shoulder line A3S = 11 cm (Shoulder length measure minus 1 cm), the distance SS1 = 3 cm.
Armhole line. Draw a bisectrix 2 cm long from point B2 corner. From the point B2 move up 6 cm. Draw the Armhole line, connect points S – 6 – 2 – B1 as shown on diagram (Fig. 1).
Side seam. For straight T-shirts, you can leave the side seam unchanged.
For fitted T-shirts: C1C2 = 2-3 сm, draw the side seam connect points B1 – C2 – D1.
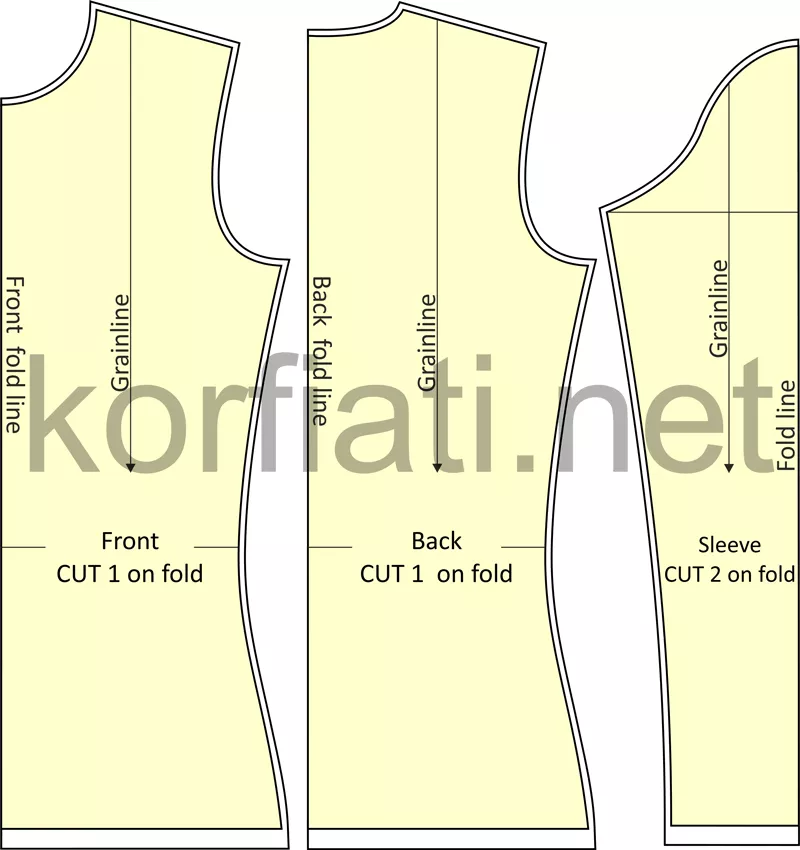
Copy the Back and Front separately, add 0,7 cm seam allowances and 2 cm for the hem. Cut one Back on fold and cut one Front on fold (Fig. 2).
To contents ▴Super-fitted sleeve pattern
Start on the right corner of the sheet.
OH = 61 cm (sleeve length as measured).
OO1 = ¾ Armhole depth minus 2 cm (for all sizes) = ¾ * 20 – 2 = 13 cm.
O1O2 = ½ Bicep circumference + 0.5 cm (for all sizes). Connect points O and O2.
Divide the segment OO2 into 4 equal parts – points O3, O4, O5.
O4K = 0,7 cm (for all sizes), O5K1 = 1,5 cm (for all sizes). Use a curve to draw the sleeve cap. Connect points as shown on diagram (Fig. 2).
HH1 = ½ of the Wrist circumference + 2 cm (ease allowance, can be change according to fabrics).
Connect point H1 and point O2 with a straight line, divide H1O2 in half and draw a perpendicular 1 cm long from the dividing point. Use a curve to draw a seam line, connecting points O1-1-H1.
Copy the sleeve pattern on the paper and cut two sleeves on fold. Seams allowances 0,7 cm, hem allowance – 2 cm.

Fig. 2. Longsleeve pattern – details
Tools and materials:
- Cotton jersey 0,7 m (wide 145 cm)
- Cotton tape 0,7 cm for shoulder seams
- Thread Madeira Aerofil № 120
- Four-thread overlock
- Coverstitch machine.


