Super-Elegant! Drafting a Pencil Skirt Pattern
Every fashionista likely has at least one straight pencil skirt in her wardrobe – a timeless basic that works for any occasion. Sleek in shape yet striking in silhouette, the pencil skirt accentuates the figure,According to one version, the pencil skirt was invented by the legendary Coco Chanel; another attributes it to the British.defines the hip line clearly, and gives the outfit a polished and elegant look. This is why it has remained a staple of both business and casual wardrobes for decades. In this lesson, we’ll explore the pencil skirt pattern.
- Super-Elegant! Drafting a Pencil Skirt Pattern
- Length and Fabrics for the Pencil Skirt
- Drafting a Pencil Skirt Pattern
- Back Skirt Panel
- Front Skirt Panel
- Cutting and Sewing a Tweed Pencil Skirt
- Key Tips for Drafting a Pencil Skirt
- Back Panel with Four Darts
- Gluteal Dart: Purpose and Drafting
- Tapering the Skirt Side Seams
Length and Fabrics for the Pencil Skirt
The pencil skirt, whether credited to Coco Chanel or the British, has become an undisputed classic in women’s fashion, symbolizing perfect fit. Its tailored silhouette, soft hip contouring, and waist emphasis make it versatile – suitable for both office wear and evening outfits.
The pencil skirt can vary in length – from above the knee to an elegant midi – but the most flattering and balanced look is achieved with a below-the-knee length. This visually elongates the silhouette, enhances proportions, and adds refinement.
Tweed pencil skirts deserve special attention: their textured fabric gives a sophisticated look, holds shape well, and is ideal for structured, polished classic-chic ensembles. In this lesson, you’ll learn a professional approach to drafting a pencil skirt pattern based on individual measurements. Pay special attention to garment balance, accurate darts, and precise allowance distribution — crucial for perfect fit. We will also cover cutting techniques and fabric recommendations — from classic suiting fabrics to stretch materials that provide comfort without losing shape. This lesson will provide a solid foundation for further pattern-making and allow you to create your own pencil skirt variations with professional precision.
To contents ▴Drafting a Pencil Skirt Pattern
Creating and sewing a pencil skirt on your own is straightforward. To model and sew this style, first draft a basic straight skirt pattern to your measurements, which can take as little as 15 minutes using just three measurements! You can also download a ready-to-use skirt pattern in 5 standard sizes and use it to model your pencil skirt.
Our tweed pencil skirt is designed to be minimalist. The pencil skirt sketch is shown in Fig. 1.
")
Fig. 1. Front and back pencil skirt sketch
Use the basic skirt pattern to model the pencil skirt shape.
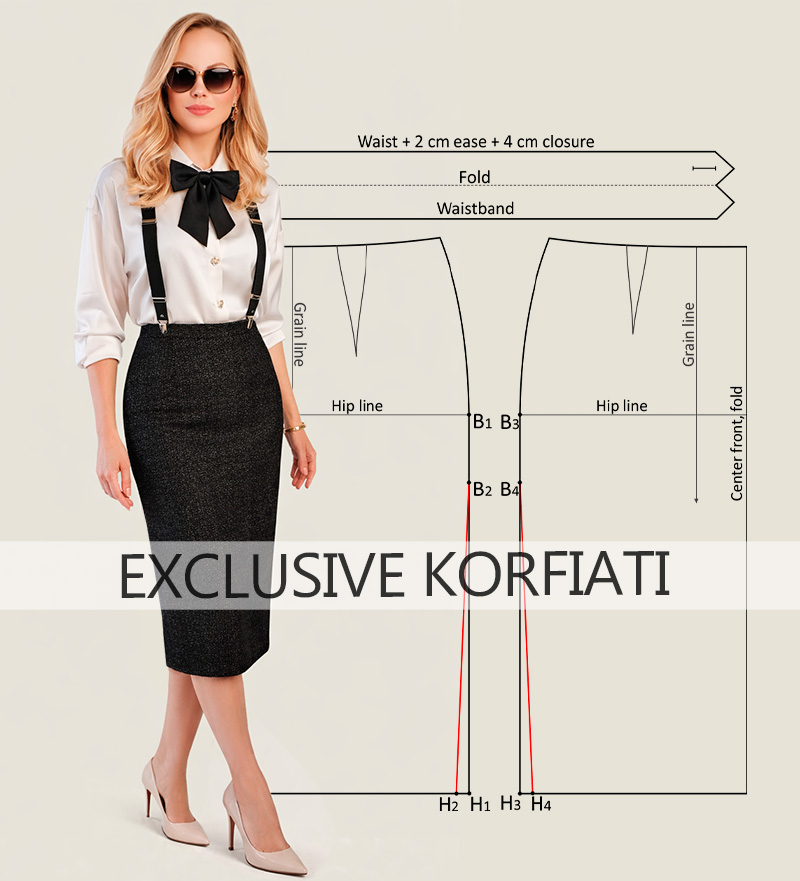
To contents ▴Back Skirt Panel
- Skirt length AH = 70 cm (27 9/16 in)
- Hip line BB1. From point B1, measure down B1B2 = 8–10 cm (3 1/8–3 15/16 in, depending on skirt size).
- H1H2 = 1.5–2 cm (5/8–3/4 in, taper at hem depends on fabric and personal preference). Connect points B2 to N2 with a straight line.
- Back center seam vent: HK = 1/3 AH = 70/3 cm ≈ 23 cm (9 1/16 in).
")
Fig. 2. Pencil skirt pattern – modeling
Front Skirt Panel
Draft the front skirt panel similarly (see Fig. 2):
- B3B4 = 8 – 10 cm (3 1/8 – 3 15/16 in), depending on skirt size.
- H3H4 = 1.5 – 2 cm (5/8 – 3/4 in, taper at hem depends on fabric and preference). Connect points B4 to H4 with a straight line.
Important! For figures with fuller thighs (“saddle” area), check the pattern 10 cm (3 15/16 in) below the hip line. Increase B1B2 and B3B4 if necessary, up to 12 cm (4 3/4 in).
Waistband Pattern. Cut a rectangular piece 10 cm (3 15/16 in) wide (5 cm (2 in) finished width) and length: waist circumference + 2 cm (13/16 in) ease allowance + 4 cm (1 9/16 in) overlap for closure. Shape the ends as shown in Fig. 2.
To contents ▴Cutting and Sewing a Tweed Pencil Skirt
To sew a tweed skirt in the original “Chanel” technique, increase seam allowances to 2 cm (3/4 in) and review the sewing process in detail:
How to Sew Garments Using the Original “Chanel” Technique
The skirt consists of two layers:
- Main fabric (tweed)
- Lining (artificial silk)
Place lining and main fabric with wrong sides together, pin, and mark stitchin lines at 5 cm intervals. The stitching lines for the back and front skirt pieces are shown in Fig. 3.
Hand-baste up to the hip line (!). Sew the front and back darts on both skirt and lining. Then finish the quilting up to the waistline.

Fig. 3. Stitching lines marking for back and front skirt pieces
Important! Quilting is done in two stages: first up to the hip line, then sew the darts, and only afterward finish the top quilting to the waist. Insert a concealed zipper in the back center seam. Hem the skirt and tack in place. Attach lining along the center seam and vent by hand. Sew side seams: main fabric by machine, lining by hand. Fold and hand-stitch skirt hem and lining hem. Attach the waistband as shown in this tutorial. Mark buttonhole and sew button. Your skirt is ready!
To contents ▴Key Tips for Drafting a Pencil Skirt
Back Panel with Four Darts
If the difference between hip and waist measurements exceeds 14 cm (5 1/2 in), add two darts on the back panel. Place the first 5-6 cm (2-2 3/8 in) from the center back: AA1 = 5 cm (2 in), dart width A1B = 4 cm (1 9/16 in), dart length = 13-15 cm (5 1/8-5 7/8 in). Divide the remaining space for the second dart: width = 2-3 cm (3/4-1 3/16 in), length = 11-12 cm (4 3/8-4 3/4 in) (Fig. 3). Draw dart legs with gentle curves.
")
Fig. 3. Back panel with four darts
Gluteal Dart: Purpose and Drafting
To accentuate the buttocks, a gluteal dart can be added along the back center seam. This enhances the silhouette without affecting hip circumference. If your design includes a vent, it will remain aligned. From the hip line, measure BB1 = 5-8 cm (2-3 1/8 in) down (depending on buttock shape) and draw a 1-2 cm (3/8-3/4 in) deep dart to the hem (HH1 = 1-2 cm (3/8-3/4 in)).
")
Fig. 4. Pencil skirt with gluteal dart
To contents ▴
Tapering the Skirt Side Seams
For a narrow silhouette, follow these guidelines. Tapering standards vary by skirt length to ensure fit and comfort. Start tapering 8-10 cm (3 1/8-3 15/16 in) below hip line to maintain hip volume. Measure B2B3 = 8 cm (3 1/8 in). Fig. 4 shows four tapered lengths: AH = 60 cm (23 5/8 in), AH1 = 50 cm (19 11/16 in), AH2 = 40 cm (15 3/4 in). Taper from B3 to hem, adjusting from H3 = 2 cm (3/4 in) left, H4 = 0.5-1 cm (3/16-3/8 in). Add a vent for walking comfort.
")
Fig. 5. Tapering the skirt side seam
Discover more patterns, sewing projects, and step-by-step tutorials on the Anastasia Korfiati Sewing School website. Subscribe to our newsletter so you never miss a new pattern or tutorial!